

Multi-Telescope Imaging Setup
Over the years, I’ve acquired a collection of imaging cameras, optical tubes, and mounts that would make for quite a combination of setups. Most telescope parts are thankfully made using standard components that fit together using 3/4” or 1/4”-20 bolts and Vixen or Losmandy dovetails, with the idea being that if your nightly target needs a different piece of gear, you can swap out that gear for something better. There’s many parallels to modern PC building, where you can make upgrades or changes to your PC rather painlessly by just replacing the parts you need instead of throwing the whole thing away and beginning anew. But as my collection of works-in-progress grew, I began to see I had the seeds for running multiple rigs for imaging multiple targets in a single night. So I needed a simple, elegant, and easy to maintain solution for controlling and monitoring each rig.
The Architecture
We’ll start with the rigs themselves. The component parts aren’t necessary to list out, but the general idea is this:
Rig 1 - A large SCT on a heavy-duty mount for imaging small galaxies and planetary nebulae
Rig 2 - A medium sized Newtonian on a large mount for imaging galaxy pairs and groups, or prominent nebulae features
Rig 3 - A widefield refractor on a smaller, portable mount that can be used to image large portions of the night sky
So to use all three in parallel, we use a tee-topology with one main computer with a large screen indoors, and each rig gets a small computer to relay commands from the main computer to the relevant devices. This naturally leads to a client-server type of setup, as I wanted to do minimal maintenance or configuration on the field computers. All the configuration and control should be done as much as possible on the main control computer
INDI & KStars
I’m already a fan of using Linux and BSD for my storage server and now my main desktop PC, so it comes as no surprise that we see it here again. It’s particularly useful in this context because I don’t need a heavy, graphical environment on each of the client PCs if all they’re going to be doing is relaying commands from the control PC. I also needed the client PCs to be as low maintenance and hassle-free as possible, so that eliminates using Windows and their automatic update shenanigans.
So what are we left with? INDI seems to be the only elegant option for alternatives to Windows, as ASCOM only works with Windows*.
*[NOTE: ASCOM seems to have announced another project, Alpaca, that runs on Linux and is “100% interoperable with ASCOM.” I haven’t had a chance to verify this claim.]
I’ve seen INDIGO floating around as well, but my experience with it is relatively minimal - I tried it once, it wasn’t well-documented at the time, and I left it alone since then. Unlike ASCOM, the drivers and control software are all included together, via the INDI core library and INDI-3rdParty repositories. No more going to each device manufacturer site that hasn’t been updated since 2002 and downloading sketchy EXEs that may or may not even work, just pull from INDI and build and run.
So we have our framework for sending commands to our rigs, via our drivers and server programs, but what do we actually use to control our rigs with? How do I tell Rig 1 that I want to slew to Andromeda and take a sequence of images on filter x, etc.? That’s where KStars comes in. KStars has built-in support for INDI, and allows you to connect to your devices that are attached to a remote computer - all you need is an IP address or hostname. Since the framework is light on the client computers, that leads us to some interesting hardware options.
Raspberry Pi
We don’t even need the computers to share CPU architectures! Since all the software we’re using is compiled using GCC and make, we can simply use whatever Linux-compatible computer we want on our field clients. If you wish, you can pick up used thin clients on eBay or Amazon, but I wanted to implement some efficiency and minimize moving parts, so I chose Raspberry Pi computers, specifically the Pi 4B. They’re extremely lightweight, work great on their version of Debian, and have USB ports to connect to their devices. I’d like to see more robust USB 3.0 implementations on them, as others have reported that device connections have dropped while using USB hubs, but I haven’t had anything like that happen to me in the field, at least not yet.
For portable setups, a Raspberry pi can also run KStars and PHD2, so it can also be entirely self-contained. I’d only recommend this if you’re using a Raspberry Pi with at least 4 GB of RAM, as you’d need to be running the graphical desktop and a VNC server for remote control. Or you could try to hook up a keyboard, monitor, and mouse directly and control it, but I wouldn’t recommend that, as autoguiding is very sensitive to nearby movement, so remote operation is always less frustrating.
Building INDI/KStars
Assuming every computer in your tree is running Linux (I’ll be assuming something Debian-based for package management), the instructions are all basically identical for each of them, and you only have to install KStars on the computer you wish to control everything with. I’m going to make an interesting choice here and not just install the indiserver and kstars packages (although you’re certainly welcome to do so) for two reasons:
I don’t want an update to either package to happen, and building from source guarantees that.
If you happen to want a new feature or a bugfix, it may not be possible to receive those until the package maintainers get around to building, testing, and deploying them to their respective repositories. Why wait?
I encourage those who are more experienced in scripting than me to develop a shell script that encapsulates all the commands I put here. I’m willing to bet one exists already, and if it does, I have a feature request - please prompt the git repository for branches that are releases, preferably in high-to-low version numbers, so users can pick which versions of each project they want.
1. Acquire the Source Code
All of these instructions are located on each project’s respective git page. For INDI, that’s here, and for KStars, that’s here. I can’t stress enough how important it is to read through these pages, as they have useful information not just on building the projects, but on contributing back if you have changes or other recommendations.
We’ll start by installing all the dependencies we need at once:
sudo apt install -y git cdbs dkms cmake fxload libev-dev libgps-dev libgsl-dev libraw-dev \
  libusb-dev zlib1g-dev libftdi-dev libjpeg-dev libkrb5-dev libnova-dev libtiff-dev libfftw3-dev \
  librtlsdr-dev libcfitsio-dev libgphoto2-dev build-essential libusb-1.0-0-dev libdc1394-dev \
  libboost-regex-dev libcurl4-gnutls-dev libtheora-dev libnova-dev liblimesuite-dev libeigen3-dev \
  libftdi1-dev libavcodec-dev libavdevice-dev extra-cmake-modules libkf5plotting-dev libqt5svg5-dev \
  libkf5xmlgui-dev libkf5kio-dev kinit-dev libkf5newstuff-dev libkf5doctools-dev gettext \
  libkf5notifications-dev qtdeclarative5-dev libkf5crash-dev libkf5notifyconfig-dev wcslib-dev\
  libqt5websockets5-dev xplanet xplanet-images qt5keychain-dev libsecret-1-dev breeze-icon-theme \
  libqt5datavisualization5-dev qtbase5-dev
On each computer, we’ll keep things organized by keeping all the code in a Projects folder, and do all the compiling in a nested build folder.
mkdir -p ~/Projects/build
Once that’s done, we’ll just clone each of our repositories, but here’s where we’ll deviate slightly by pulling the latest releases of each project instead of just whatever the latest code is (referred to as master branch). I think this strikes a good balance between getting something that’s new without dipping into unstable territory. This is where you’ll have to look at the releases page for each project to determine which release tag or branch we want. At time of writing, INDI’s latest release is v2.1.1, and kstars’ is stable-3.7.4. The only project that doesn’t have a release branch is StellarSolver, our plate solver of choice.
On every computer, including your central control PC:
cd ~/Projects
git clone --depth=1 -b v2.1.1 https://github.com/indilib/indi.git
git clone --depth=1 -b v2.1.1 https://github.com/indilib/indi-3rdparty
and on your central control PC, in addition:
git clone -b stable-3.7.4 https://invent.kde.org/education/kstars.git
git clone https://github.com/rlancaste/stellarsolver.git
2. Compiling and Installing the Source Code
Once all the code is downloaded, we can go ahead and create build folders for them
mkdir -p ~/Projects/build/indi-core ~/Projects/build/indi-3rdparty-libs \
  ~/Projects/build/indi-3rdparty ~/Projects/build/kstars ~/Projects/build/stellarsolver
and for each project we’ll generate the makefiles necessary for compiling. I’m making the conscious decision to build all the INDI 3rd-party libraries and binaries, to maximize compatibility. You don’t have to do this, and can instead just install whatever 3rd-party drivers you need for your rig. You’ll need to build and install each module in this order to make sure you don’t get dependency issues.
indi-core
indi-3rdparty-libs
indi-3rdparty
cd ~/Projects/build/indi-core
cmake -DCMAKE_INSTALL_PREFIX=/usr -DCMAKE_BUILD_TYPE=Debug ~/Projects/indi
make -j$(nproc)
sudo make install
cd ~/Projects/build/indi-3rdparty-libs
cmake -DCMAKE_INSTALL_PREFIX=/usr -DCMAKE_BUILD_TYPE=Debug -DBUILD_LIBS=1 ~/Projects/indi-3rdparty
make -j$(nproc)
sudo make install
cd ~/Projects/build/indi-3rdparty
cmake -DCMAKE_INSTALL_PREFIX=/usr -DCMAKE_BUILD_TYPE=Debug ~/Projects/indi-3rdparty
sudo make install
Once those three are built and installed on all machines, you can now compile and install stellarsolver and kstars (in that order) on the central control PC. Once this is done, you now have fixed versions of everything you need to run the setup!
cd ~/Projects/build/stellarsolver
cmake -DCMAKE_INSTALL_PREFIX=/usr -DCMAKE_BUILD_TYPE=RelWithDebInfo -DBUILD_TESTER=ON ~/Projects/stellarsolver
make -j$(nproc)
sudo make install
cd ~/Projects/build/kstars
cmake -DCMAKE_INSTALL_PREFIX=/usr -DCMAKE_BUILD_TYPE=RelWithDebInfo ~/Projects/kstars
make -j4
sudo make install
I’d love to get around to packaging this so you can just send a .deb package to each of your computers instead of having to wait around for compilation, but for now this solution works.
Connecting Your Rigs
Now that we have our KStars and components built, you should be able to simply launch KStars from the control PC
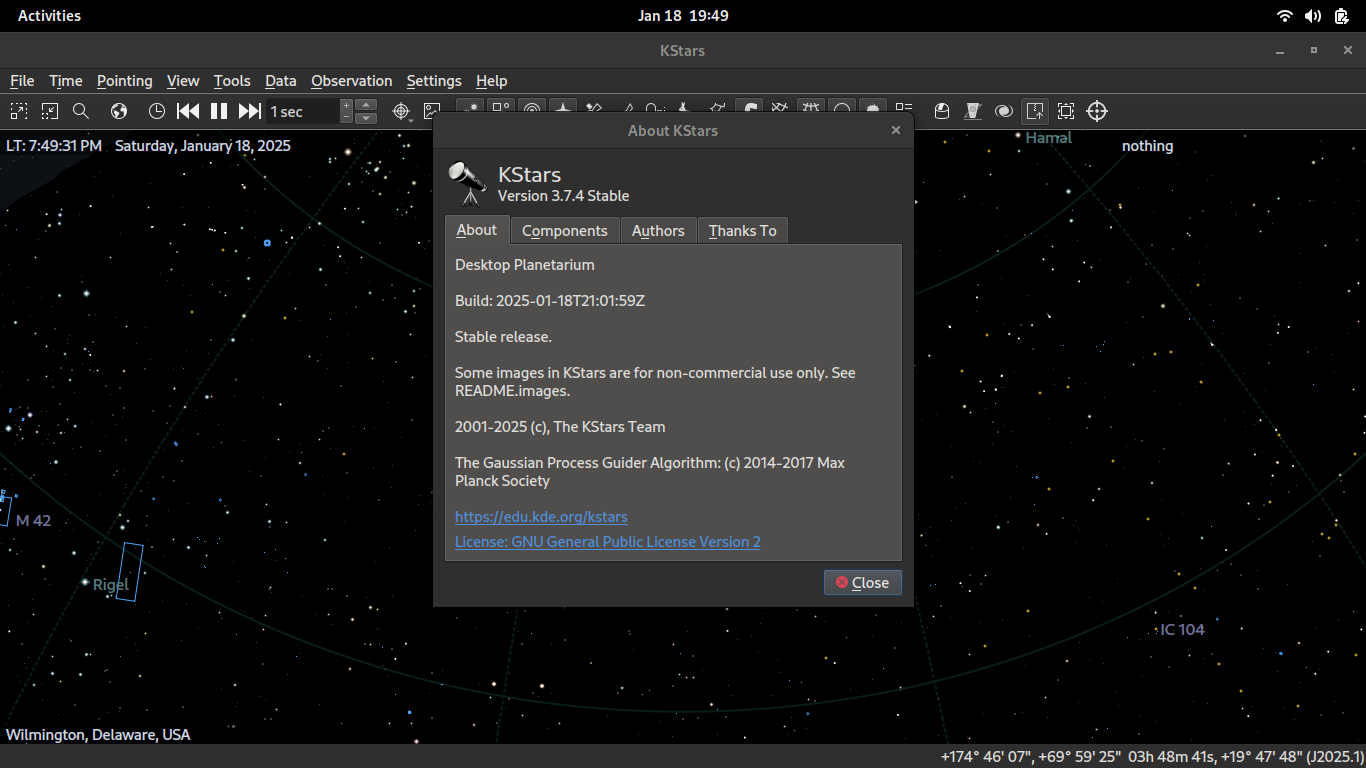
The KStars main page, showing the planetarium. The about screen is here showing the version matches what we just compiled.
At this point, we can connect via SSH (open a remote terminal) to each of the client computers and run the INDI server, along with whatever drivers we need, or for more convenience we can add what we need to each computers’ crontab:
crontab -e

* * * * * indiserver driver1 driver2 ...
Or, for more convenience, we can use the INDI Web Manager by installing it via pip:
cd ~/Projects
git clone https://github.com/knro/indiwebmanager.git
sudo pip install indiweb
and we can edit the indiwebmanager.service file in our indiwebmanager folder to reflect our client PC username.
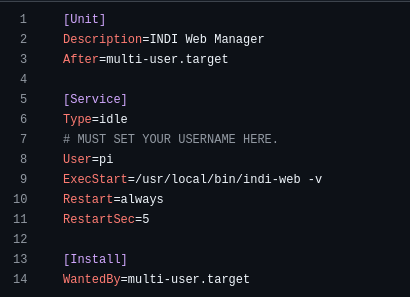
Make sure you change the User to whatever your username is. If it happens to be pi, then leave it be.
Everything else should be left the same. The multi-user target just indicates that it’ll load this process at the end of the boot sequence.
Once this is configured to what you need, just move the file to be with the rest of the systemd services, allow it to be executed, and reload systemd
sudo cp indiwebmanager.service /etc/systemd/system/
sudo chmod 644 /etc/systemd/system/indiwebmanager.service
sudo systemctl daemon-reload
sudo systemctl enable indiwebmanager.service
sudo reboot
Again, there’s probably a way to automate this via a shell script, and if I get around to making one, I’ll happily update this post to include it.
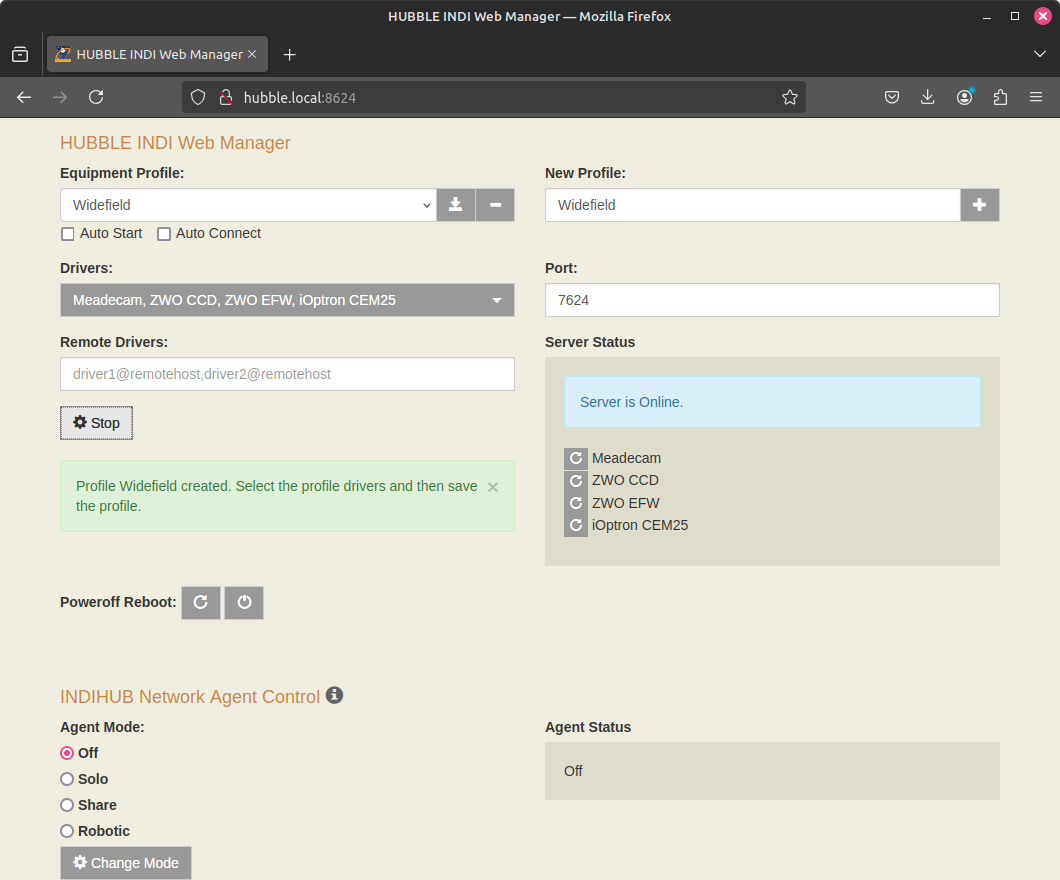
The INDI web manager running on one of the telescope control computers, in this case hubble.
Here you can see it’s running a saved profile called Widefield that loads all the necessary drivers for my connected devices, such as my camera, mount, filter wheel, and guide camera.
At this point, it’s just a matter of selecting which drivers you wish to run on your client PC, saving the profile, and starting them. You can even set them to auto-start and auto-connect if you aren’t planning to tear down a particular rig!
This is everything needed to be set up on the client computers, so assuming you haven’t already, you should be able to go ahead and hook up your client PCs to your telescope rigs

As a quick side note, if you’re ever unsure about the IP address of your client PC, you can use nmap to find all the local IP addresses on your network
Each detected IP should return with a hostname, such as here we can see my client PC Violet, so you can either set them statically in your KStars profile configuration or just use their hostnames. In my experience, static IP is the way to go, because sometimes the resolver doesn’t detect the hosts that are there.
Back to KStars, we can go ahead and Run Ekos, our telescope control system, and start creating a profile:


And simply repeat for each client PC, along with their associated devices! Once all your profiles are created, you can launch different instances of KStars/Ekos, and simply start whichever profile you want on whatever KStars instance you’d like. If you have multiple monitors, I’d suggest having each profile on a different monitor, but if you like having just one monitor, I’d strongly suggest making use of multiple desktops (or workspaces) in Linux, such as here in GNOME:

And you’re done! Go ahead and set your imaging targets, start your sequences, and collect data.
A huge thanks from me goes out to each of the developers and maintainers of KStars and INDI, without whom none of this would be possible, and I’d be stuck running something a lot less versatile or elegant. I’m already in discussions regarding hosting a Debian package to make all of this easier for the end-user, but for now this can serve as a standalone guide.
Clear skies everyone.